Small miniatures are moving their heads back, and the fort looks very cute. Many of us spend most of our childhood collecting these miniatures. But now is the time you can get your personalized bobbleheads at any price range. Custom bobbleheads are the hottest products in the market. And who would not like the idea of having a custom bobblehead just on the sitting desk?
They kill the season of boring gifts like photo frames, comic books, and shaving kits. Now custom bobbleheads have become an entertaining and exciting gift of the modern generation. No one can deny this precious and unique gift.
You can order it online. For starters, the procedure is quite simple. Infect, all you need is to upload a picture and choose the body style you want. You can even ask for customized color and hairstyle if needed.
But have you ever thought of making a bobblehead yourself? Definitely not, but you can do it.
Here’s the complete guideline about how to make you a bobblehead yourself. Let’s get started.
Material required:
White Polymer clay, 20-gauge wire,24-gauge wire, Aluminium foil, Wooden base, Epoxy glue, Oven, Artist’s paint brushes, and acrylic paints
Procedure:
Steps 1: Search for awesome pictures like superheroes, sports bobbleheads, Baseball bobbleheads, football bobbleheads, and so on. Determine the selected picture features that depict its characters. With the help of a cutter, cut a 20-gauge wire into several pieces for legs, hips, and feet. Then bend the wire into a “U” shape with pliers.
Step 2: The next step is wrapping the lower body wires with aluminum foil. Also, wrap the foil at the bottom of the legs with wire. Then take polymer clay and knead it with your fingers until it becomes smooth and pliable. Now cover the aluminum foil at the bottom of the body with clay and smooth it using your fingers.
Step 3: Drill two holes by placing the wooden plate below the feet. Now place the foot wires inside the holes and hold them while sculpting. Then cut the piece of wire and put it vertically into the clay portion of the lower body. Cover the cut piece with clay and start shaping the neck, shoulders, and torso.
Step 4: In this step take two balls of clay. Sculpt the doll shoes with fingers and remove the wooden base behind the feet. Insert the shoes in foot wires and glue the feet into the drilled holes in the rigid bottom with epoxy glue. Use needle tools and knives to craft the desired clothes through polymer clay. Add fine details to the clay after sculpting.
Step 5: Now sculpt the arm, hand through clay and attach them to the shoulders. Take a large piece of clay for crafting your head. Make an enlarged head referring to the photo and sculpt facial features, hairs, and ears using sculpting tools. Your bubblehead is almost done. Now bake the structure in the oven at 250-degrees for an hour. Remove it and check it is completely dried.
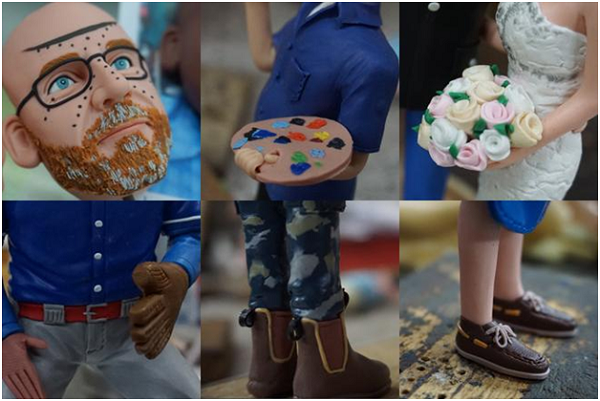
Step 6: It’s time to use acrylic color for painting through Artist’s brushes. Add fine details in every feature of the eye, lips, button, cheeks, freckles, and even shoelaces.
Step 7: Now take a spring and place it on the top of the neck with the help of a wire. Twist the wire at the end and cover it with polymer clay. It’s time to place the head over the spring and glue it with epoxy. Attach head and body, add embellishments like earings made by wire and flower if needed.
Conclusion:
Making a custom bobblehead is not an easy task. The process takes hours or even several weeks. But it would help if you always had Professional artists that give you some valuable suggestions. If you want a Bobblegifts, you can order it online. A bobblehead is a mini version of yourself greeting you with a friendly nod all the time.